Monday, May 24, 2021

Moving Blog to New Platform!

 **Dear Fellow Cooks and Foodies - I am moving my blog to a new platform and eventually, all my recipe posts will be hosted on the new platform and this one will be shut down.  

     It will take some time to transfer all of my posts, so you will be able to find my recipes on this blog for the next few months, but if you are looking for a recipe and don't find it here, it may have been moved. 

    My new blog address is persnicketypanhandler.com   All my new recipe posts will be there so be sure to check for those as well. 

      I appreciate your continued support and hope you enjoy my beloved recipes - old and new!  I am always discovering and remembering recipes I love to share with you.  Life is a never-ending food exploration!  So much to cook - so little time!   Many thanks and keep cooking!  - Michele


Friday, April 30, 2021

Mousse Mound-tain with Coconut Cookies


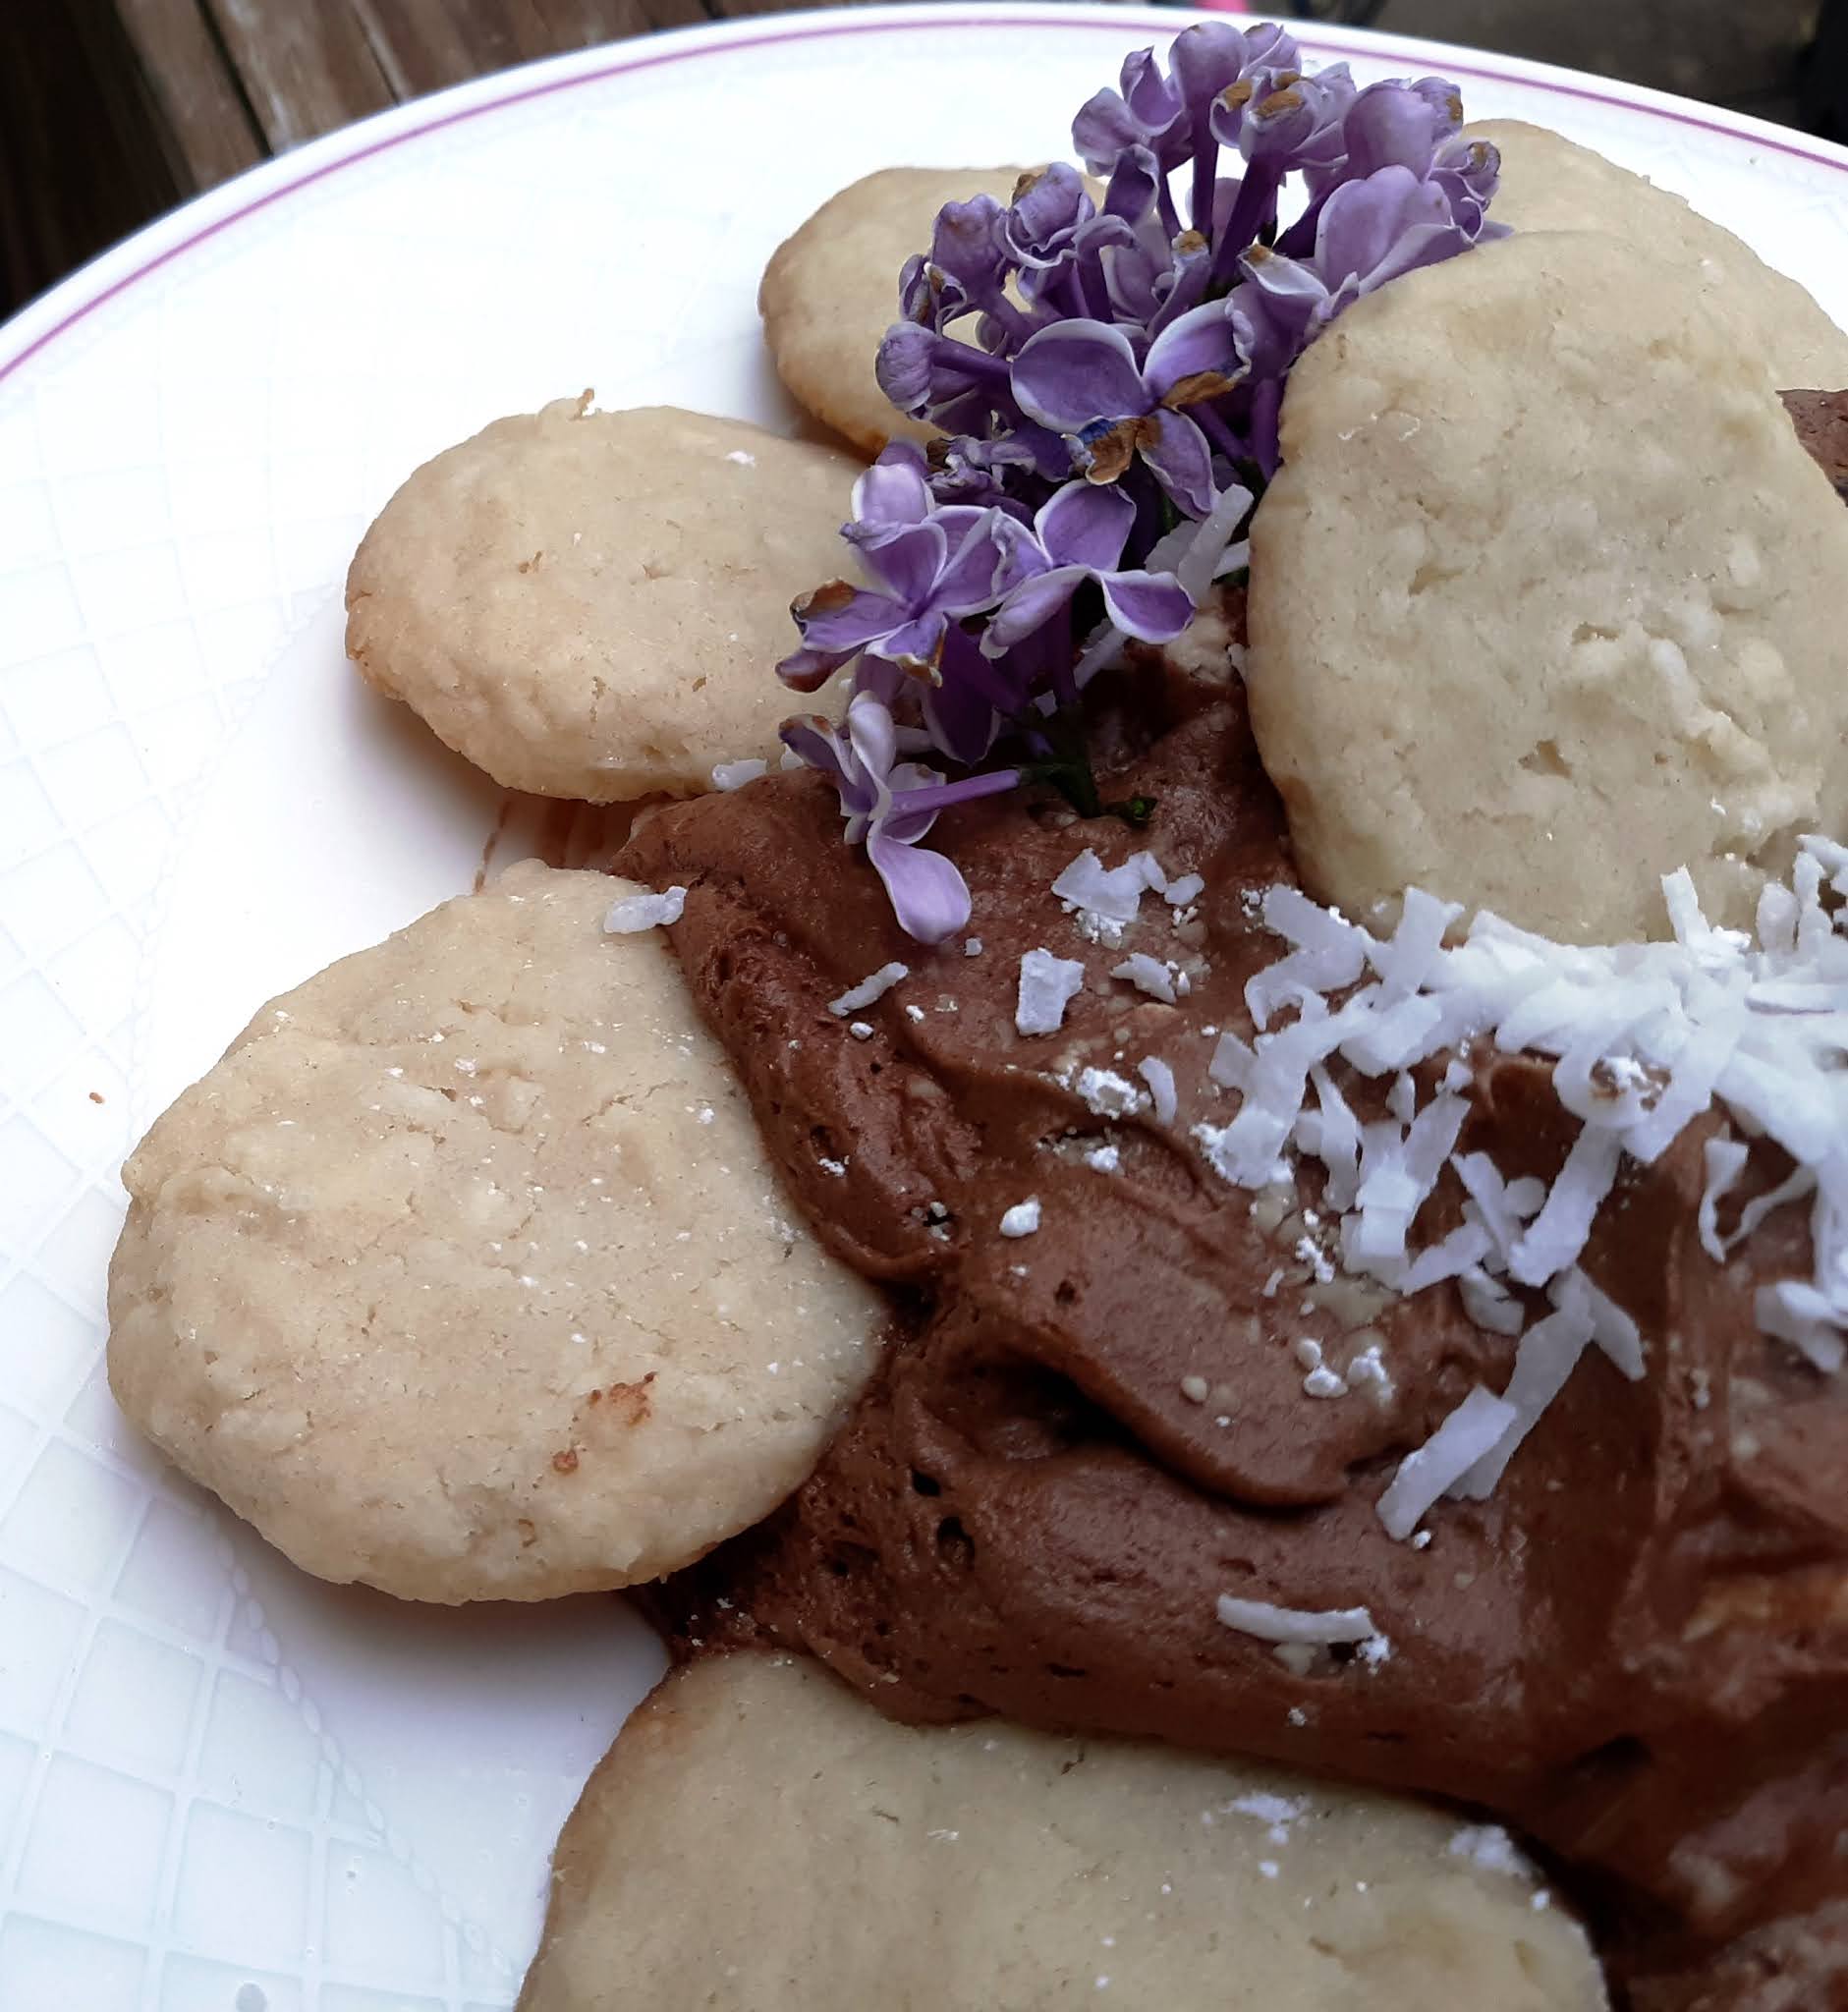
       You must remember the first time you tasted chocolate mousse, your eyes widening as the exquisite richness dawned on your senses.  The velvet, creamy texture, and the intensity of the rich chocolate certainly caught my attention. And was it mouse or moose and if it was moose, did it have antlers?  I am just one of many who has mispelled it on a menu! For most of us, the taste was love at first bite.  (There are actually those that don't care for chocolate, imagine!)  To those "unfortunate of pallet", we will do what we can to win you over - this may be one of those desserts that will change your mind about chocolate!

      Leave it to the French to create this concoction of cream, eggs, sugar and chocolate (sometimes butter) that makes any dessert worth breaking a diet for, worth saving a bit of room for, worth the expense of the ingredients to make it.

      Inspired by the numberless appetizers, that consist of dips and spreads and something to be dipped into them, it didn't seem much of a jump to a dessert of the same fashion.  The following was the result. 

      And if you still can't convince those chocolate-haters among us, you could branch off into other mousse choices like caramel mousse, lemon mousse, white cholate mousse, pumpkin mousse with cookies that will complement your flavors (a shortbread cookie is universally appropriate).  Then everyone can enjoy dessert. Now for those that don't care for desserts, it might have to be back to the savory appetizer dips and dippers for them!

Thick Chocolate Mousse

1/2 cup butter softened

3 egg yolks

3 egg whites

1/2 cup sugar

7 ounces good-quality 70% good-quality chocolate or 6 ounces semi-sweet chocolate and 1 oz. unsweetened

2/3 cups heavy cream

1 tablespoon vanilla extract

pinch of salt


     -Melt chocolate in small saucepan.  Stir in butter until melted.  Let cool 10 minutes.

     -Beat chocolate mixture and egg yolks in small bowl on high speed for 5 minutes.  Refrigerate, covered for 5-6 minutes.

    -In separate mixing bowl, beat 3 egg whites until soft peaks form.  Beat in 1/2 cup sugar, 1 tablespoon at a time until whites are stiff and glossy.

    -Fold egg white mixture carefully into chocolate mixture.  Allow mixture to set for 10 minutes in refrigerator.

    -Whip cream until soft peaks form and add vanilla. (you can use the same bowl as used for the egg whites - no need to rinse it out for the cream.)  Fold cream gently into chocolate mixture until mostly incorporated - a few streaks of cream is fine.  (For the mound-tain purposely leave streaks of white to create interest.)


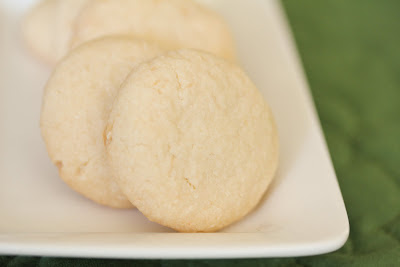
Coconut Shortbread Cookies

3/4 cup butter softened  

1/3 cup sugar

1 1/2 teaspoons vanilla extract

1 3/4 cups flour

1/2 teaspoon baking powder

1/4 teaspoon salt

1 cup flaked coconut

1/2 cup finely chopped pecans or walnuts (optional)                                                  

     -Beat butter at medium speed until creamy.  Gradually add sugar, beating well.  Stir in vanilla.

     -Gradually add flour, baking powder and salt to butter mixture, mixing well.  Sit in coconut and nuts, if using.  If mixture is sticky, chill for about 30 minutes.

     -Roll dough into 1 inch balls and place on parchment-lined cookie sheet.  Press each cookie slightly with the bottom of a glass, dipped in flour to flatten dough a bit.

     -Bake cookies in 350 degree oven until they just begin to turn golden around the edges, 10 - 12 minutes.  Remove to cooling rack and let cool.


To Assemble Mound-tain:

     -Neatly scoop and pile chocolate mousse onto center of a round serving platter.  (Mousse will make a more attractive mound if immediately placed on the platter before chilling.)  Cover mound with plastic wrap and chill until ready to serve.

     -Place cookies around the edge of the mound and one on top so guests understand the cookies are to be dipped into the mousse.  Sprinkle with toasted coconut, a bit of powdered sugar and decorate with fresh flowers for a springy touch of color.

     -Serves 6-8

Gently fold cream into mousse,
 leaving a few streaks of white.

Coconut shortbread cookies


Dip cookies into chocolate mousse mound


Mound mousse on center of serving tray,
 place cookies around and garnish with powdered sugar and coconut.


Tuesday, April 27, 2021

Southwest Eggrolls


     These unique crispy, savory appetizers first appeared in restaurants in the 80s.  I was introduced to them by one of my daughters who worked in one such restaurant.  An eggroll wrapper filled with almost anything works well, but with Mexican ingredients and flavors they are a marriage of brilliance! (Mexican food is one of my top five favorites for sure so I had to find a way to bring them into my own kitchen.)  and here they are!
     Beef, pork, chorizo, turkey would be just as happy to snuggle down into one of these wrappers in concert with the veggies and spices, so use your imaginations and let this recipe be a jumping-off point.  I have wrapped Arab-spiced fillings, turkey with a Thanksgiving inspiration and of course many Asian-inspired fillings which feel very much at home blanketed in their indigenous eggroll wrapper.  Interestingly enough, I have never filled them with eggs!  Hmmm - a new one to try!
    You can try the option of baking them, by brushing the filled wrappers generously with oil and baking at 400-425 degrees until golden, but they never achieve quite the same silky crunch they acquire from frying.  It depends on what you want to achieve.  As long as I'm making them, I go for the gold of the fried crunch!
    

Southwest Egg Rolls
3 cups shredded cooked chicken
1 cup chopped onion
3 cloves garlic, minced
1 can chopped green chiles
1/2 large red bell pepper, chopped
1 can black beans, drained and rinsed
1 cup frozen corn niblets, thawed
2 tablespoons cornstarch
3/4 cup chicken stock
salt and pepper to taste
dash of dried red pepper flakes
juice of 1 lime
3/4 cup chopped green onions, with green ends
1 1/2 cups grated cheddar or Mexican cheese blend
1 package 6 x 6 inch egg roll wrappers, or
     16 small flour tortillas, thin variety
oil for frying

     -In a large skillet, saute onions, red pepper and
      garlic in 2 tablespoons oil until very soft.  Add
      chiles, chicken, beans and corn and warm
      through.

     -Sprinkle cornstarch over mixture and stir until
      cornstarch is absorbed.  Pour in chicken stock and
      cook over medium-high heat until stock thickens.
      Add red-pepper flakes, green onions and squeeze
      lime juice over.  Mix about 2 minutes over 
      medium-high heat.  Season to taste with salt and
      pepper.

     -Remove from heat and allow to cool about 15 
      minutes.  Stir in cheese.  Set aside or chill until
      ready to use.

     -Lay egg roll wrappers on a clean work surface, 2
      or 3 at a time, in front of you with the square
      wrapper turned so a point faces you (creating a
      diamond shape).  If using tortillas, it doesn't
      matter as they are round.

     -Place about 2 tablespoons of filling on bottom
      third of wrapper and spread out to about 3-4
      inches. Working from the bottom point, closest to
      you, wrap the bottom end up over the filling
      tucking it snugly against the filling. Turn in the
      two outer points, then roll completely to the top
      as snugly as you can.  Wet the top point with
      water and press against the wrapped filling to
      help hold that point in place.  (See pictures
      below.)

     -Heat about 1 inch of oil in skillet or wok to 350
      degrees on thermometer over medium-high heat. 
      Place eggrolls in the oil, seamside down and fry
      until golden brown on one side then turn with
      tongs and fry on the other side until golden. 
      Remove to paper-towel-lined plate and let cool
      about 10 minutes before serving.

     -Lay rolls on bed of shredded lettuce and garnish
      with slivered green onions and thinly sliced red
      pepper strips.  Serve with sour cream, salsa,
      guacamole and pico de gallo on the side.  Makes
      16-20 rolls.

Saute vegetables and add chicken,
stock and spices.

Lay wrapper in diamond shape. Place
filling on bottom 3rd of wrapper.


Fold bottom point over filling, 
tucking it in snugly.


Fold 2 side points inward, over filling.


Wet top point and continue to 
roll to top.


Serve eggrolls with sour cream, guacamole and salsa.


PERSNICKETY  NOTES:

    **Technically, these are not eggrolls unless you use eggroll wrappers,
        however, they are also good wrapped in thin flour tortillas and tend
        to be sturdier.  I am a fan of both - the eggroll wrapper has a flakier,
        crispy texture while the tortilla is more traditional for a Tex-Mex
        bready texture.  But the melding of two cuisines is part of what
        makes them unique.  Try them both ways and see what you prefer!

   **If your filling mixture becomes too wet, just drain it in a colander 
       for a few minutes before filling wrappers.  Wrappers will tend to
       break open if the mixture is too wet.  The tortillas don't mind as
       much.

   **I like to place my cooked rolls on a bit of a slant on the paper-
       towel-lined platter, so some of the oil can drain off.  You can place
       the handle of a wooden spoon on the platter to lay them against.

  **These can be made ahead and kept chilled for an hour or so before
      frying.  They may also be frozen for future use - freeze well-wrapped
      before cooking them.  Allow to sit at room temperature for 10 - 15
      minutes before frying.  To reheat cooked rolls, place the rolls on a
      tray and bake for 10 minutes at 325 degress to re-crisp them.

Sunday, April 18, 2021

White Bean Chili


A lighter alternative to kidney bean and beef chili:

White Bean & Chicken Chili:

1 pound white navy, or cannellini beans
      (or 3 cans white navy or cannellini beans, drained)
2 tablespoons vegetable oil
1 onion, chopped
1 peeled, diced carrot
4 cloves garlic, peeled and minced
1 large tomato, diced
1 medium green bell pepper, diced
2 tablespoons ground cumin
2 tablespoon chili powder
1 can chopped green chilis
1/2 - 1 cup Hatch Green Pepper Sauce
       (to taste - to make it hotter add the full cup)
dash of cayenne pepper or dried red pepper flakes
5 cups chicken broth or 5 cups water and 3 cubes
        chicken bouillon
8 - 10 strips bacon, fried until crisp and cumbled
1 tablespoon bacon drippings
dash of liquid smoke
2 cups cubed or shredded cooked chicken
salt and pepper to taste

     -If using the dry beans, soak beans in a large bowl
of cold water overnight or 2 -3 hours.  Drain and rinse.

     -In a large pot, heat oil then saute onion, carrot, green pepper and tomato until soft, over medium heat.  Stir in garlic cloves and cook for 1 minute more.  Add broth to vegetables along with cumin, chili powder, green chilis and Hatch green salsa.  

     -Add the drained beans along with the chicken broth, liquid smoke, bacon and bacon drippings.  Let simmer for 45 minutes to an hour over medium heat,
covered, stirring occasionally until beans are tender.  Season to taste with salt and pepper.

     -Stir in cooked chicken and continue to simmer another 10 minutes.  Chili will thicken as it cooks.

     -Serve with grated cheddar cheese and/or sour cream on top.  Minced green onion also adds a fresh taste to the beans and sliced, fried corn tortillas and fresh red pepper strips add a nice crunch.

     -(Can be stored in fridge 3 -4 days.  When reheating, add water if chili is too thick)
Serves 6 - 8


Saute vegetables until tender


Garnish chili with cheese, sour cream,
 tortilla strips, chives or fresh 
red pepper slices.


Friday, April 9, 2021

Risolles a la Dauphine


Rissoles a la Dauphine

(Hand-held meat pies from the region of France known as Dauphine)

1 recipe puff pastry or frozen puff pastry sheets (generally found in

                             the freezer section with dessert pastries)

Beef Filling:

     12 ounces ground beef

     2 large shallots, finely chopped

     2 cloves garlic, peeled & minced

     1 tablespoon dried Herbs de Provence

     2 teaspoons lemon zest

     2 teaspoon salt and freshly ground pepper, to taste

     2 eggs, slightly beaten

     2 tablespoons olive oil

     2 tablespoons finely minced fresh parsley (1 tab. dried)

     8 ounces grated gruyere or parmesan cheese

     vegetable oil for frying

     -In a skillet, heat olive oil and add shallot and fry about      5 minutes until softened.  Add garlic and continue cooking for another minute.  Add the beef and brown, breaking the meat apart as it is cooking.  Add the Provencal herbs, lemon zest, salt and pepper and taste for seasoning.  Cool mixture then mix in 1 egg and minced parsley to bind it together.  Set filling aside or chill until ready to use.

For pastry:

      -Remove pastry sheets from the wrappers and set them on the counter for about 5 minutes.  Unfold each pastry sheet and open to the shape of a tent and allow them to continue to thaw another 5 - 10 minutes.  

      -Lightly flour your work surface and roll one sheet at a time out into a rectangle, approximately 12 x 14 inches. Using a 4-        5 inch doughnut cutter or ring, cut out as many circles as you can.  This recipe should make about 18 Risolles.  Repeat with other puff pastry sheet as needed.

     -Brush edges of each circle with egg wash made of one beaten egg mixed with 2 tab. milk or water.  Place 1/4 to 1/3 cup of        filling in the center of each pastry round.  Sprinkle each with        gruyere cheese.  

     -Fold circle in half, enclosing filling and pinch edges together tightly with your fingers.  Place on cookie sheet lined with parchment paper or silpad, at least 1 inch apart, then crimp edges of Risolles together firmly with the tines of a fork.

     -Bake in preheated 375 degree oven until puffy and golden,    25 - 30 minutes.  Serve warm or at room temperature with the Persillade dip (below).  


Persillade Dip:

4 tablespoon olive oil

1 ounce fresh flat-leaf parsley, finely chopped

1/2 ounce fresh tarragon leaves finely chopped (or dried)

1/2 shallot, peeled and finely chopped

1/2 ounce fresh dill, finely chopped (or chives)

1 garlic clove, finely chopped

    -Mix above ingredients and allow to sit at room temperature for at least 1 hour.  Season to taste with salt and pepper. Store in the fridge.  Serve as dip either cold or at room temperature.


  1. Roll puff pastry out to large 1/4 inch thick rectangle.

Cut pastry into rounds and brush
 edges with egg wash.

Place beef filling on each pastry round,
top with cheese and fold over into half circle.

Place on cookie sheet and seal edges by
 pressing firmly with fork tines.

Beautiful, golden, flaky pastry with
delicious beef and cheese filling!


PERSNICKETY NOTES: 
**Herbs de Provence originate from the southern region of France, Provence, and are combinations of the following dried herbs: rosemary, fennel seed, savory, thyme, basil, marjoram, lavender flowers, parsley, oregano, tarragon, bay powder.  Or you can buy this combination from Amazon or can sometimes find it in the spice aisle of your local store.  There are also recipes for it online, but I prefer buying it already mixed.  Cheaper and less work!

**Lemon Zest is simply the finely grated rind of a lemon.  You can use the finest holes on your grater or use a microplane grater to shave tiny bits of the rind off the lemon.

**Making your own puff pastry is so much fun and gratifying, but truth be told, I generally buy the frozen puff pastry to save time and effort.  If you want to master the art of making puff pastry, start with the short-cut version often called "rough puff" pastry.  There are several videos and different versions of how to make it on youtube.  This is a great one to try if you are interested:  https://www.youtube.com/watch?v=6XQY4KDIo24&t=25s    It's so delicious because there is so much butter in it!

**Re-using puff pastry scraps.  Do not ball scraps together like you would with sugar cookie dough.  This will destroy the layers of pastry you have worked so hard to achieve.  You can lay the scraps on top of each other, cover with plastic and chill for an hour, remove from fridge and then roll out again to 1/4 inch thickness.  Cut out more circles at this point or simply cut into rectangles, sprinkle with cinnamon sugar and bake for a delicate pastry cookie!


Wednesday, March 31, 2021

Rainbow Jello Snacks


Jello Rainbow Fingers

1 - 3 oz. package Jello (with sugar) of the following colors:
     Strawberry
     Orange
     Lemon
     Lime
     Blue Raspberry
     Grape or Black Cherry
3 cups boiling water
3 cups plain yogurt (not Greek yogurt)

      -In a large 2 or 4 cup glass measuring cup, empty contents
       of Strawberry Jello mix.  Pour in 1 1/4 cup very hot water.
       Stir until sugar dissolves, about 3 minutes.  Pour 1/2 cup 
       of this water into a small mixing bowl and set aside.

      -In a deep rectangular baking dish 10 x 8 inch or 9 x 13 inch,
       pour the 3/4 cup jello mixture into the bottom.  Let chill in
       fridge for 1 hour until very well set.  Meantime, mix 1/4 cup
       plain yogurt with reserved 1/2 cup liquid jello mixture and
       beat with whisk until smooth and yogurt is completely 
       incorporated.  Pour over set jello in pan and rotate so that the
       mixture completely covers the bottom layer. Let chill for 30
       minutes until set.

      -Repeat process above with each of the flavors of Jello listed.  If
       you want to be precise with the order of colors in the 
       rainbow follow the order as listed above.  Remember, Roy G.
       Biv for the order of the colors.  (There is no indigo in this
       recipe - a difficult color to find and create.)  To help with the
       violet layer, add more blue food coloring to create a truer
       violet color.

      -In the end you should have created 12 layers - one clear layer
       of each color, followed by an opaque yogurt layer of each
       color.   Chill until very firm, several hours or overnight.

     -To slice into fingers that people can pick up and eat, cut into
       squares about 3 inches by 3 inches and remove from pan with
       a thin metal spatula.  Set on cutting board and cut into long
       finger or sticks shapes about an inch by an inch, or into any
       shapes desired.  The smaller the pan used to mold jello, the
       taller the fingers will be which will have a harder time
       standing up but can be served laying down. The rainbow effect
       is still so much fun.