Wednesday, March 31, 2021

Rainbow Jello Snacks


Jello Rainbow Fingers

1 - 3 oz. package Jello (with sugar) of the following colors:
     Strawberry
     Orange
     Lemon
     Lime
     Blue Raspberry
     Grape or Black Cherry
3 cups boiling water
3 cups plain yogurt (not Greek yogurt)

      -In a large 2 or 4 cup glass measuring cup, empty contents
       of Strawberry Jello mix.  Pour in 1 1/4 cup very hot water.
       Stir until sugar dissolves, about 3 minutes.  Pour 1/2 cup 
       of this water into a small mixing bowl and set aside.

      -In a deep rectangular baking dish 10 x 8 inch or 9 x 13 inch,
       pour the 3/4 cup jello mixture into the bottom.  Let chill in
       fridge for 1 hour until very well set.  Meantime, mix 1/4 cup
       plain yogurt with reserved 1/2 cup liquid jello mixture and
       beat with whisk until smooth and yogurt is completely 
       incorporated.  Pour over set jello in pan and rotate so that the
       mixture completely covers the bottom layer. Let chill for 30
       minutes until set.

      -Repeat process above with each of the flavors of Jello listed.  If
       you want to be precise with the order of colors in the 
       rainbow follow the order as listed above.  Remember, Roy G.
       Biv for the order of the colors.  (There is no indigo in this
       recipe - a difficult color to find and create.)  To help with the
       violet layer, add more blue food coloring to create a truer
       violet color.

      -In the end you should have created 12 layers - one clear layer
       of each color, followed by an opaque yogurt layer of each
       color.   Chill until very firm, several hours or overnight.

     -To slice into fingers that people can pick up and eat, cut into
       squares about 3 inches by 3 inches and remove from pan with
       a thin metal spatula.  Set on cutting board and cut into long
       finger or sticks shapes about an inch by an inch, or into any
       shapes desired.  The smaller the pan used to mold jello, the
       taller the fingers will be which will have a harder time
       standing up but can be served laying down. The rainbow effect
       is still so much fun.


Sunday, March 14, 2021

Scones (Fried Bread)


       Until well into my teens, I had no idea that the British had laid claim centuries before I was born, to the "scone", a dry biscuit pastry that had to be served with tea just to wash it down.  How could this be, I wondered and assumed the English, from whom I am descended, were unfortunately mistaken but then when I considered that an entire British nation was confused, I confess, I had to question my assumptions about food origins.
      In my search for the truth, I looked inwardly to examine my own culinary heritage, a tradition that included pioneers crossing the North American plains in covered wagons with yeast and flour preciously stored in cushioned barrels.  My mother carried on the pioneer tradition and called these fried, golden yeast squares, "scones".  As her mother had done before her, she taught me how to stretch the dough a bit just before cooking, to ensure the scones rose with a pillowy puff in their middles as they cooked.  
     In my imaginings, I could make it work; the pioneers' encounters with Native Americans were for the most part friendly....perhaps even included exchanges of culinary techniques and recipes?  Regardless, stubbornly I continue to defend my heritage and proclaim scones to be thinly rolled yeast enriched dough, cut into squares or triangles and deep-fried until golden.  Versatility allows them to be served with butter or if in the mood for a sweet version with honey, jam, or powdered sugar.
     Often, my children's Sunday family dinners were scones and soup, the only variable being the kind of soup served (I confess to being a bit of a softy - preparing 2 - 3 different soups to satisfy 6 diverse clamoring appetites.)  Scones partner equally well with chili, stews, bisques, as a side bread and alone as dessert with ice cream and toppings heaped on top.
    And as to the British scone, we now have an amicable relationship and I have known a Brit or two to enjoy my scone version as well.  I just call theirs "tea biscuits" and they can call mine "Indian Fry Bread", but only to themselves.

Scones:
2 tablespoons dry yeast
1/4 cup lukewarm water
2 cups warm water
1/3 cup sugar
2 tablespoons vegetable shortening
2 tablespoons soft butter
1 tablespoon salt
2 eggs
5 cups all-purpose flour, approximately
3-4 cups vegetable oil for frying

    -Sprinkle yeast over 1/4 cup water in small bowl.
      Set aside for 5 minutes.  In large mixing bowl,
     combine 2 cups water, sugar, shortening, 
     butter and salt. Mix with wire whip until smooth.
     Stir in dissolved yeast and eggs.  Mix well.  Add
      flour a cup at a time until dough pulls away from
     the sides of the mixer or comes together in a ball if
     mixing by hand. If mixture is too sticky add a bit
     more flour 1/4 cup at a time, until you can handle
     the dough. Knead for 5 minutes by hand or with
     electric mixer with the dough hook.

   -Place dough in a large oiled bowl and cover with
     plastic wrap.  Let sit in warm place or in the oven
     on "bread proofing" setting for about 1 1/2 hours,
     or dough may be refrigerated 8 hours or 
     overnight.  (This longer process allows dough to
     rise slowly.)  If you refrigerate your dough, let it
     sit out about an hour before rolling out to cut out
     the scones.

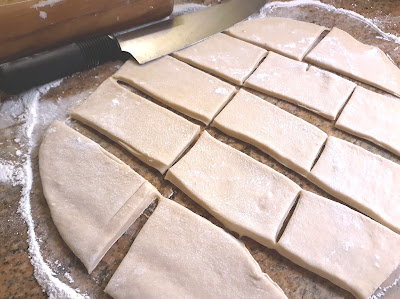
    -When ready to use, punch the dough down & roll
     dough to 1/4 inch thickness on a floured surface. 
     Let dough rest 10 minutes then cut into 3-4 inch
     squares or rectangles.  Let dough rest another 30
     minutes.

    -Heat vegetable oil to about 375 degrees in deep
      fryer or large, deep skillet or dutch oven.  Place
     dough squares carefully onto hot oil, pulling and
     stretching dough slightly just before adding to the
     oil.  Scones should float while cooking and not rest
     on the bottom of the pan.

    -Cook until golden brown on first side and
     scones puff up in the middle.  (Sometimes the
     squares do not puff....they are still delicious, so
     serve them anyway.)  Turn squares with tongs to
     the other side and continue to cook until golden
     (about 3-4 minutes total cooking time).  Place on
     paper towels. Serve warm or at room
     temperature    Makes about 3 dozen scones.


Shape dough into disc and roll on
well-floured surface


Cut dough into 3 -4 inch squares or
rectangles and let rest 30 minutes.


Place each square into hot oil and
fry until golden and puffy.


Serve warm scones with butter, honey, 
and jam or as an accompaniment to
soups and stews.

PERSNICKETY  NOTES:

**When rolling out the dough, be patient.  It has a tendency to shrink 
    back to its previous shape.  Roll it then walk way for a few minutes to
    let it rest, then roll again and give it another rest.  You will eventually
    coax it out to the thickness you want it to be.

**This scone is also similar to the Mexican sopapilla and can be served
    with Mexican food, dipped in salsa or sprinkled with cinnamon sugar
    as a dessert.


Thursday, March 11, 2021

Potato Kibbeh


      The story of why I never learned to make Kibbeh:

           Kibbeh or kubbeh is a traditional Levantine dish from the Arab countries of Lebanon, Jordan and Syria made from lamb or beef and bulgur (cracked wheat).  The most popular version is basically a fried, stuffed meatball in the shape of a little football - at least the one that shall live on in my dreams is.  A shell is formed from ground meat and onions mixed with fine bulghur, a cavity created, then filled with more cooked ground meat, onions, spices and pine nuts, the outer casing pinched closed smoothed and then fried.

           Kibbeh is very difficult to get right.  It's one of the things I most wanted to learn to make in the Middle East so I approached the best cook I knew, the mother of a friend of ours. I asked my friend, the cook's daughter-in-law, if she would ask her if I could come and watch her make them which Um-Amar (the Syrian cook) agreed to. But when I got there she had already made them and presented a tray of them to me as a gift.  I just don't think she understood or wanted anyone to watch her make them.  

        Over the years, I have made many attempts at creating these glorious, crunchy, meaty snacks (including for weddings and parties - sometimes I'm more confident than I should be) but have always failed with cracks or shells that haven't been crispy or just fell apart.  I've studied numerous recipes. I know all the techniques, how to stuff and roll them, how to mix ice chips into the outer layer so it's really cold, how to keep your hands wet and smooth out all the cracks with ice water, freeze them before frying....I know it all, but they still don't work for me!

         So, while living in Jordan, I gave up and would buy them from the Lebanese cook who ran a catering company.  Those were our favorite but we always ordered them at any restaurant as part of the mezza.  While living in Israel and shopping in Jerusalem, we would always stop first at a shop owned by a Palestinian friend where he would insist we sit to rest and he would have his son run and get us fresh orange juice and the best kibbeh ever from an old man that made them in the market.  They were huge - 3 times the regular size.  We were in heaven!  Then the old man hopefully went there as he died.  That was the end of those kibbeh.

          However, I finally found a recipe that worked for me!  It was the recipe from a friend of my daughter's whose parents lived in the West Bank the same time we were in Israel.  However, I lost the recipe and was embarrassed to ask Jameela for it again as she was kind of miffed with us as we lost our dog while visiting our daughter in North Carolina and had to leave without the dog, to come back to Virginia.  Our daughter had to leave for a work trip to Africa when we left.  But happily, someone called us as soon as we arrived home to tell us they had found the dog (we had put flyers around) so we asked Jameela if she would get the dog and we would drive back down and get it "soon". 
          Well, she got the dog but wasn't happy about it as he was defiling her carpet but we just couldn't get down there right away.  We checked into kennels and doggy daycare there but could find nothing available.  So the dog stayed with her for 10 days until our daughter returned and we could get down there.  Jameela has not been our friend since and there went the only recipe for kibbeh that ever worked for me.
         The following recipe is the only silver lining to my rocky culinary relationship with kibbeh The bottom and top layers are replaced with mashed potatoes mixed with bulgur then simply layered in a baking dish and baked.  I could handle that, besides which, it is delicious in its own way.  Now, I will not say that I enjoy it more than fried kibbeh (the football shaped ones) but certainly more than kibbeh nayeh (the raw one which I forced myself to taste and found that it was smooth and silky and also delicious, but was too freaked out at the thought of "raw " to take another bite.) Then there is kibbeh saniyeh which is layered and baked in a pan and looks similar to the potato kibbeh.  You can master this one too!  And if you've already mastered fried kibbeh, let me know.  Meantime, I'll make the potato kibbeh but continue my quest to master the authentic kibbeh.  And when I do, I will share it with you!

Kibbeh Batata

Meat Filling:

     1 finely chopped onion

     1/4 cup butter

     1 pound lean ground beef

     2 teaspoons cinnamon

     1 1/2 teaspoon ground allspice

     1 tablespoon tomato paste

     salt and pepper to taste

     1/2 cup toasted pine nuts

     -In a medium skillet, melt the butter and add        the onion. Saute onions over medium heat until soft.  Add the ground beef, breaking it up as it browns.  Stir in cinnamon, allspice, tomato paste, and salt and pepper.

       -Cook over medium-low heat stirring frequently, about 10 minutes to allow spices to meld.  Stir in 1/4 cup pine nuts.  If mixture is too oily, drain off some of the oil but leave a bit of the melted butter in the mixture.  Set aside.

Potatoes

     1 onion , cut in thin slivers

     3 medium-large  potatoes, peeled and cut into 8ths

     1/3 cup fine bulgur

     5 tablespoons water

     3 tablespoons olive oil

     1 teaspoon salt

     1/2 onion, chopped

     2 tablespoons fresh parsley, chopped

     1/3 cup toasted sliced almonds

     paprika

      -Place the slivered onions into a microwave-proof mixing bowl and toss with 2 tsp. salt.  Microwave the onions for 5 minutes on high and then rinse in a colander.  Spread the onions out on paper towels or a clean dishcloth and blot out as much moisture as you can.  Let rest until cool.

    -In a medium skillet heat 1 tablespoon of oil over medium-high heat.  Add the slivered onions and 1 teaspoon salt and stir for 2 minutes.  Lower heat to low and allow onions to caramelize, stirring occasionally, about 20 minutes.  Set aside.

     -Place the potatoes in a pot with salted water and cook over high heat until water comes to a boil.  Cover with lid and turn heat to medium-low and continue cooking for about 40 minutes or until the potatoes are tender.  Drain and mash the potatoes with a potato masher.

       -Add 5 tablespoons hot water to the bulgur and allow to sit for 20 minutes. Place 1/2 onion, olive oil and bulgur in a food processor and pulse until the mixture is smooth.  Pour mixture over warm potatoes and mash and stir until smooth.  Add salt and freshly ground black pepper to taste.  Stir in chopped parsley.

To Assemble:

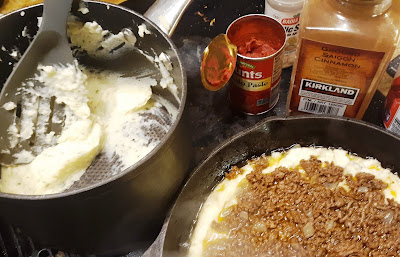
        -Heat 2 tablespoons butter in medium-large cast-iron (or other) skillet over medium-high heat.  Layer half the potatoes over the bottom of the skillet.  Spoon meat mixture over potato layer and then cover meat layer with another layer of potatoes.  Cook for 5 minutes then reduce heat to medium and continue to cook another 10 minutes.  (Lift edge of bottom potato layer to check for doneness.  Potatoes should be browned and slightly crispy.)

       -Remove from heat.  Let kibbeh sit for 5 minutes.  Score top of kibbeh into diamond pattern if desired.  Garnish top with 1/4 cup toasted pine nuts, toasted sliced almonds, fried onions and a sprinkle of paprika.  Cut into wedges to serve.


Layer of potatoes on bottom of skillet, 
covered with layer of meat filling.


Meat sauteed with onions and spices.  
Potatoes combined with onion and bulgur.


Garnish with sliced almonds, pine nuts
carmelized onions and paprika.